Can Timestamps Be Preserved?
When copying files, we typically expect the destination files to retain the same modification dates as the originals. In most cases, this will be true and everything will just work as expected! Our sync, backup, and migration tool Syncovery is able to preserve modification timestamps in the vast majority of cases. It just works, because most file systems and protocols allow keeping the file dates.
However, in some cases, you may observe that the “Last Modified” dates of files have been lost. It may have happened because a tool or method was used to copy the files that didn’t support preserving timestamps. The problem can also occur when using Internet Protocols such as FTP and WebDAV. And some cloud services do not support retaining modification dates at all: especially S3 and Rackspace Files. On the positive side, the timestamp problem does not occur with Windows networking (CIFS/Samba), SSH/SFTP, and many modern FTP or even some WebDAV servers. Modern cloud services such as Google Drive, DropBox, Box, Backblaze B2 and others are also not affected.
Troubleshooting Timestamps
If you do see modification timestamp issues when copying within the local area network, please update Syncovery to the latest version. If this doesn’t help to preserve modification dates, please edit your profile and go to the tab sheet “Special”->”More” and choose:
Double-Check Each File's Destination Timestamp After Copying.
FTP and WebDAV servers traditionally use the current system time for all incoming files. So the timestamp on the FTP server becomes different from the Last Modified time on your computer. In some cases, this is not a problem (for example if you only copy files to the FTP server). However, if you need to copy bidirectionally or really need to preserve the timestamp, here’s what can be done.
The best thing to do would be to install a more modern FTP server software that allows setting the timestamps, or switching to a different protocol, such as SSH/SFTP.
Adjusting Modification Dates of Existing File Copies
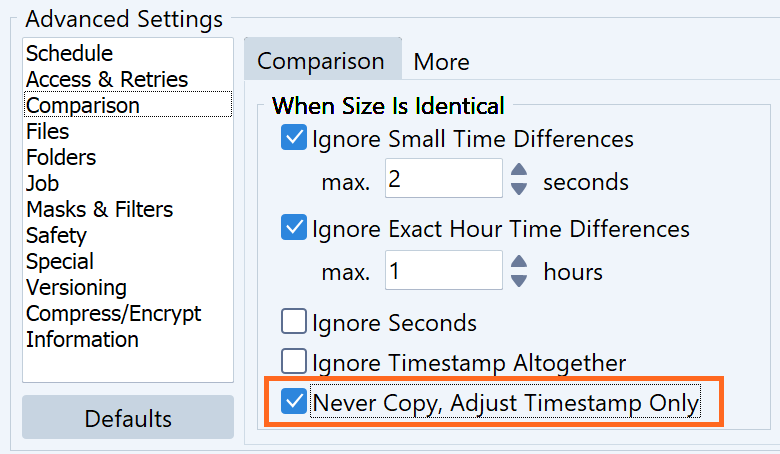
Sometimes when you have copied files with another tool, you may see that the timestamps got lost. You can use Syncovery to make the modification dates match again. Syncovery will look for files with identical names and file sizes and adjust the timestamps on the destination for you. The checkmark is on the “Comparison” tab sheet and it’s called “Never Copy, Adjust Timestamp Only”, as shown on this screenshot:

Filename Encoding to Store Timestamps
If the server software can’t be replaced, you could use Filename Encoding to retain the timestamps on the FTP server. You’ll find that option on the Versioning tab sheet. Filename Encoding will modify the filenames by adding the date and time to them, so you can only use it if it’s OK that the filenames look encoded on the server. You’ll find an example of encoded filenames on our page about file versioning, since Filename Encoding is also used to keep multiple versions of a file.
SmartTracking Can Remember and Ignore Timestamp Deviations
If filename encoding can’t be used and you need to do a bidirectional synchronization, there is still another option. You can use SmartTracking, which can remember the timestamp that the server assigns to the files when they were uploaded. That way, it can recognize if the files have been changed or not, even if the timestamp is not identical to the one on your computer. For this, please choose the SmartTracking operating mode on click the Configure button. Go to the Options tab sheet and choose “Detect Unchanged Files” for the online side. Uncheck the other option “Also Ignore File Sizes Being Modified”, which is rarely needed. It can however be useful for Sharepoint sites, which frequently add metadata to incoming Office documents, thereby changing the file sizes.
If you have already uploaded files and their timestamps do not match, you can use this SmartTracking method (as described above) to handle the problem. First you need to let the program build the database so that it remembers the existing timestamps. Do this by starting the profile manually and choosing “Show: Unaffected” in the Sync Preview so that it doesn’t copy any files but adds them all to the database.
