Deleting in Unattended/Scheduled Mode
Important note for all sync modes regarding deletions: if you want to run the profile in unattended mode, for example by running the scheduler, then you need to also give it explicit permission to delete the files. To do so, please:
- Edit the profile in Advanced Mode
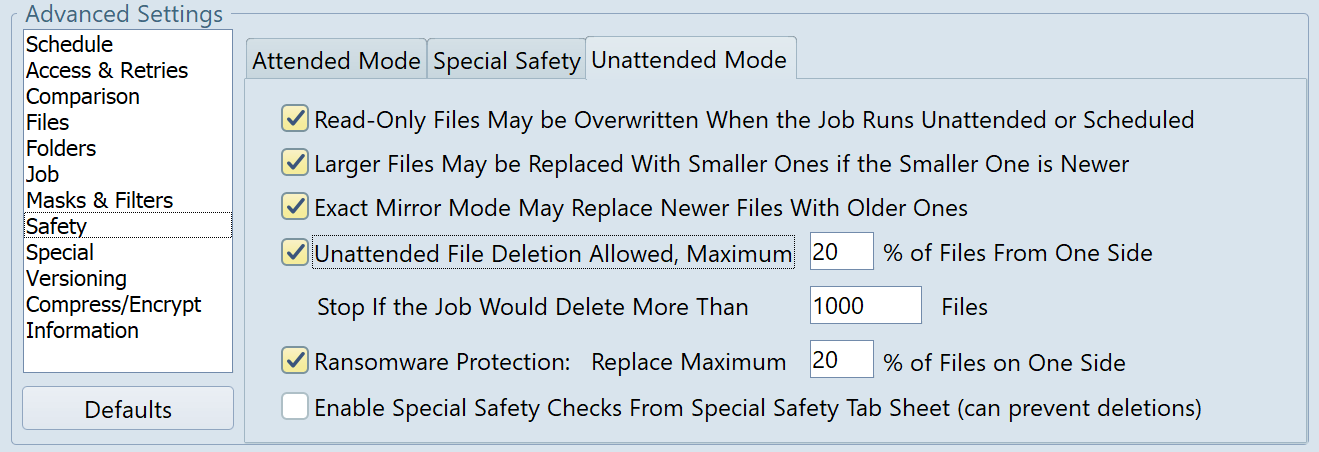
- Go to the Safety->Unattended tab sheet
- Choose “Unattended File Deletion Allowed” and specify a maximum percentage of your files that you expect to be deleted on any day. If the deletions exceed that percentage, they will be prevented to avoid accidental loss of data.
- You also need to specify a maximum number of files that can be deleted.
- Also remove the last checkmark, “Enable Special Safety Warnings”, because these can prevent deletions from being carried out.
Please see this example screenshot of typical settings with unattended deletions allowed:

These safety thresholds are very important to prevent deletions in case of a malfunction or drive confusion. For example if you mirror from drive D: to E:, and you get a new drive D:, these limits prevent accidental complete deletion of your E: drive. This can really help prevent accidental deletions. So please keep the numbers low, as in the screenshot. Don’t set it to 100% and don’t enter an unnecessarily high number of files that may be deleted.
General Instructions to Synchronize Deletions
- If one side is always the “model” and the other side is always the “mirror”, i.e. you are copying only in one direction, then you can use Exact Mirror mode to synchronize deletions.
- If you are working on both sides, and copying files in both directions, then you must use SmartTracking to detect and handle file deletions.
SmartTracking
When you choose SmartTracking, please click the Configure button open a separate dialog with a few options where you can specify how certain situations should be handled. SmartTracking can recognize these situations by keeping a database and comparing the current state of your folders with the last state stored in the database.
- You can set it to move the file into a folder for deleted files whenever it recognizes a deletion. This works similar to a recycle bin. It won’t physically delete the file for safety reasons. You need to choose a folder for deleted files (one for each side of the sync). This folder should by outside of the hierarchy that you are syncing.
- For SmartTracking to work, you always need to use the same profile for syncing the same folders, because the database is specific to each profile, and the program must use the same database always. In addition, you need to start the profile on the same computer each time.
- Deletions will be recognized starting with the second synchronization after you turn on SmartTracking. During the first run, the database is built.
Deletions in Real Time Sync
Note that the Real-Time mode (when using “Process Each File Event Individually”) has its own setting for deletions. On the other hand, when you are using the real-time mode “Process Complete Folders”, then deletions are carried out according to the paragraphs above.
To enable deletions to work in real time individual event mode, please edit the profile in Advanced Mode. Go to the “Schedule” settings category and to the Monitoring/Real-Time tab sheet. Click on the checkmark “Real-Time Synchronization”. A dialog will pop up where you need to make sure that the checkmark “Process deletions when running in real-time” is chosen, and that the Safety Delay matches your requirements. Many users will just want to set it to 0.
